
Your photo wallpaper is on its way to you or you have just received it. You are almost ready to get started, but make sure you are well prepared. Check your wallpaper carefully and make sure you have all the accessories at home! In 3 simple steps you are ready to apply your photo wallpaper to your wall!
Read the text below or watch the video in which we explain step by step how to check the order and prepare the glue.
Step 1: Check your order
When you receive your order from us, we ask you to check the order. In the packaging you will find a packing slip and a manual in addition to your wallpaper. Your wallpaper is loosely packed in foam, so that it is not damaged during transport.
Check the dimensions of your order on the packing slip. The dimensions you see on the packing slip do not include a margin of 5 cm all around. When you have chosen a margin, your total wallpaper will be 10 cm wider and higher.
How to apply photo wallpaper
Before you start, also read the manual. In the manual you will find tips, so that you can get started right away and the result will exceed your expectations! You should carefully remove the wallpaper from the foam. Do not use scissors or a knife for this. Chances are that you will damage the wallpaper. The stickers are easy to remove, after which you roll the wallpaper out of the foam.
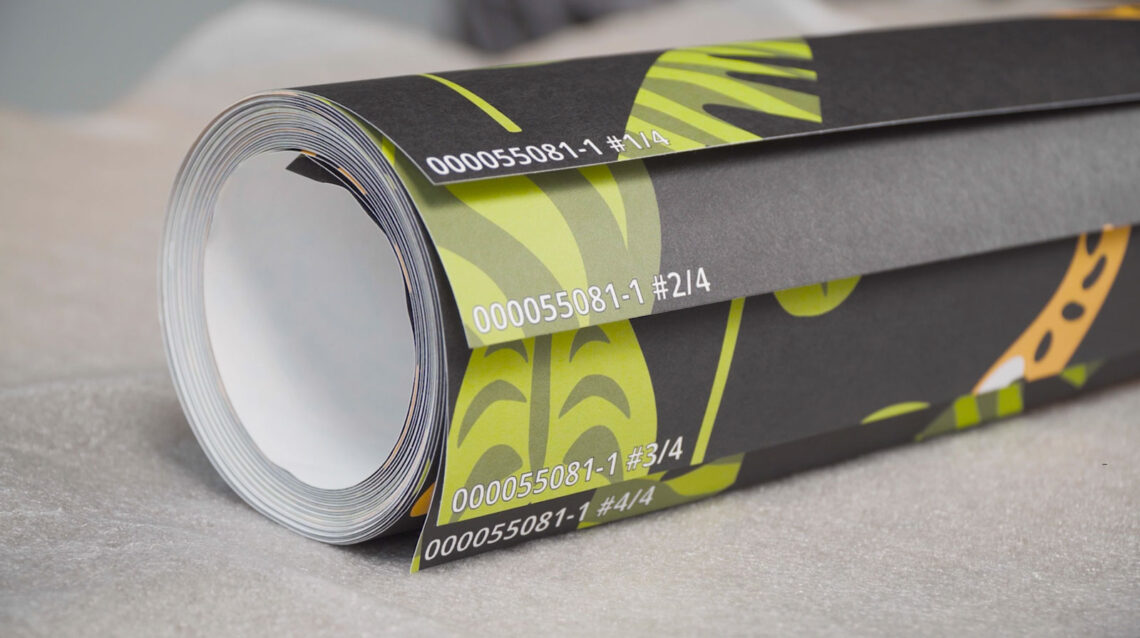
Track numbers on your wallpaper
At the bottom of the strips you will see a code. This is a unique code for your wallpaper. These numbers are printed in the margin area of your photo wallpaper and you will later cut it off from the strip when you have pasted the strip. Behind the code are your track numbers. This is the order in which you should apply the wallpaper from left to right.
Step 2: The right accessories
To make wallpaper glue we need the following:
- A bucket
- Wallpaper adhesive
- A measuring cup (which we will soon fill with cold tap water)
- A wallpaper spatula
Make sure you use wallpaper glue that is suitable for non-woven wallpaper. We recommend Perfax Roll-on line.
You will need a number of accessories to apply your wallpaper to the wall:
- a wallpaper brush;
- a Stanley blade;
- a wallpaper spatula;
- a seam roller, and a
- wallpaper ruler.
Step 3: make the wallpaper glue
Let’s start making the glue. Take the bucket and sprinkle the wallpaper glue in the bucket. Add cold tap water to the wallpaper glue. You can read the ratio of glue and water on the packaging of the wallpaper glue.
If you use Perfax Roll for non-woven wallpaper, we recommend 4 liters of water for a full package. If you need less, stick to the ratio on the package.
Then gently stir the wallpaper glue until you have a firm liquid glue. Depending on the amount of glue you make, this can take 5-10 minutes. Then let your wallpaper glue rest for another 10 minutes and then stir it again.
You are now ready to wallpaper!